Hoe we het beheer van een account met meer dan 50 gebruikers automatiseerden en tegelijkertijd voldeden aan de data governancestandaarden
Steeds meer bedrijven plaatsen Snowflake in het hart van hun data platform. Zelfs als het een beheerde oplossing is, moet je nog steeds de omgeving beheren. Dat kan een uitdaging zijn, vooral voor grote bedrijven.
Een van de uitdagingen is toegangscontrole. Dit is een cruciaal onderdeel van elk data governance-programma. Snowflake biedt kant-en-klare functies om deze uitdaging aan te gaan. Maar als je tientallen gebruikers en terabytes aan data hebt, zijn de ingebouwde functies niet genoeg. U moet nadenken over een strategie om uw account te beheren.
We hebben het al meegemaakt. Voor een van onze klanten beheerden we een account met meer dan 50 actieve gebruikers. We ontwierpen een oplossing om het toegangsbeheer op te schalen.
Dit artikel beschrijft de belangrijkste lessen van het afgelopen jaar.
Initial situation
Voordat we ons aansloten bij organisatie, was het account opgezet en waren er al veel goede ideeën geïmplementeerd. Er waren aangepaste rollen gemaakt. Gebruikers werden zorgvuldig beheerd. Maar er waren een paar beperkingen:
We creëerden een nieuw systeem om de toegangscontrole te beheren en deze tekortkomingen te bestrijden.
Access control framework design
Eerst trokken we alle standaard roltoewijzingen (SYSADMIN, USERADMIN ...) aan gebruikers in ... Slechts een paar mensen konden die rollen aannemen. Dat waren de mensen die verantwoordelijk waren voor de administratie.
Ten tweede hebben we een raamwerk voor toegangscontrole gemaakt op basis van aangepaste rollen. We definieerden twee soorten aangepaste rollen:
We hebben ervoor gekozen om toegangsrollen op databaseniveau te definiëren. Dit maakt het eenvoudig om de privileges van de ene omgeving naar de andere te repliceren met behulp van zero-copy cloning. Het was ook een afweging tussen de flexibiliteit die we eindgebruikers gunnen en de strikte toepassing van het least privilege principe.
Op databaseniveau hebben we 3 niveaus van toegangsrollen gedefinieerd:
We hebben een vergelijkbare strategie toegepast voor toegang tot magazijnen met twee soorten rollen:
Hieronder wordt ons raamwerk geïllustreerd. Pijlen staan voor subsidies.
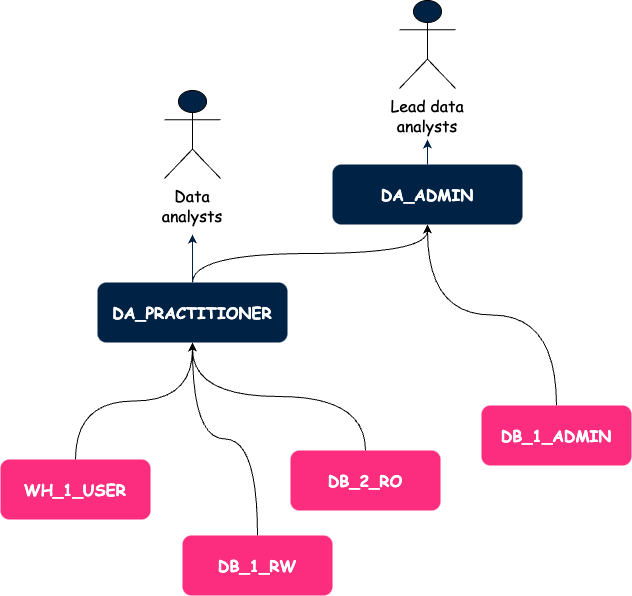
Op dit punt hadden we een beter idee over hoe we machtigingen zouden beheren, maar we hadden ook problemen met gebruikersbeheer.
User management
We hebben Single Sign On ingesteld zodat Snowflake-gebruikers zich kunnen aanmelden via Azure Active Directory (AAD). Zo verwijderden we de complexiteit van het onderhouden van twee databases met gebruikers en was het offboardingproces robuuster. We hoefden de gebruiker alleen maar uit te schakelen in AAD en de verwijdering werd automatisch gerepliceerd naar Snowflake.
Aangezien er een mapping is tussen AD-groepen en rollen in Snowflake, konden we een rol toekennen aan elke gebruiker die we aanmaken. We volgen hetzelfde proces voor elke nieuwe gebruiker.
Het is het proces voor echte menselijke gebruikers, maar het pakt niet een van de beperkingen aan die aan het begin van dit artikel zijn genoemd: het gebruik van persoonlijke referenties voor geautomatiseerde taken.
Daarom hebben we serviceaccounts geïntroduceerd. Het beheer van serviceaccounts lijkt erg op wat we net hebben beschreven. Het enige verschil is dat we voor elke serviceaccount een functionele rol maken. Er is een één-op-één relatie tussen serviceaccounts en hun rollen. Zo beperken we strikt de reikwijdte van de machtigingen voor elke serviceaccount.
Die stappen waren grote verbeteringen. Alles werd gedocumenteerd. Teams namen het nieuwe framework snel over. We waren tevreden.
Maar we besteedden nog steeds veel tijd aan het handmatig verlenen van toegang en omdat dit erg handmatig was, was het ook foutgevoelig. De behoefte aan een tool om deze taken te automatiseren was duidelijk.
Automation to the rescue
We hadden een paar opties:
Uiteindelijk hebben we een CLI in Python gemaakt.
We geven de voorkeur aan het gebruik van Terraform om infrastructuur te implementeren en alleen infrastructuur. Ongewenst gedrag kan optreden als je gebruikers en rechten gaat beheren met Terraform. Geheime rotatie is bijvoorbeeld erg moeilijk te beheren.
We houden van bash, maar alleen voor ad-hoc en eenvoudige bewerkingen. Hier moeten we configuratiebestanden laden, communiceren met de Snowflake API en data structuren manipuleren. Dit is mogelijk, maar het zou op de lange termijn moeilijk te onderhouden zijn.
Naast dit aspect hadden we ook betrouwbaarheid nodig. Een manier om dit te bereiken is het schrijven van tests. Dit is eenvoudiger te doen in programmeertalen zoals Python.
Wanneer je het hulpprogramma uitvoert, gebeurt er het volgende achter de schermen.
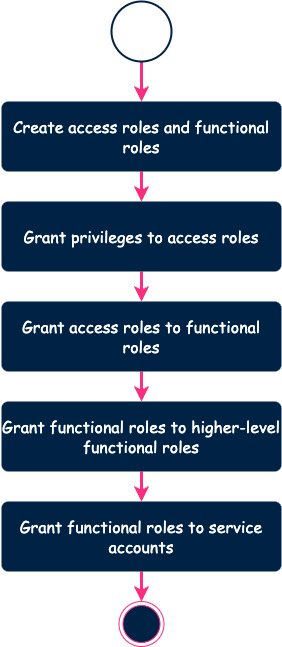
Het is de bedoeling dat de tool geen rol maakt die al bestaat. Hetzelfde geldt voor privileges. De tool berekent het verschil tussen de configuratie en de omgeving op afstand en past de benodigde wijzigingen toe. Hierdoor kunnen we downtime voorkomen.
In eerste instantie hebben we deze tool lokaal uitgevoerd. Maar dit kon tot problemen leiden. We konden bijvoorbeeld conflicten krijgen tussen twee engineers die tegelijkertijd wijzigingen probeerden aan te brengen. Daarom hebben we een workflow opgezet op basis van de CI/CD-mogelijkheden van Azure DevOps (ADO).
Opmerking: we gebruikten ADO, maar je kunt hetzelfde doen met GitHub, GitLab of Bitbucket.
Dit is het uiteindelijke proces.
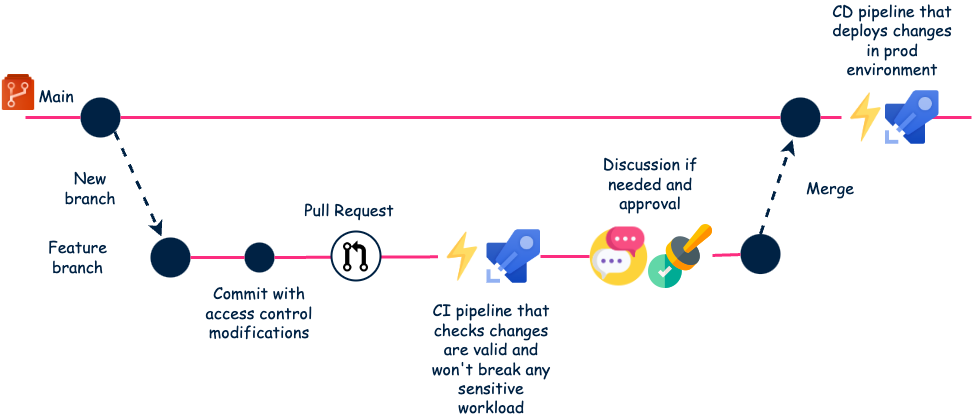
Deze volledig geautomatiseerde workflow werkt erg goed. Tests vangen defaults vroeg in de CI-pijplijn. En verplichte review is ook een manier om incidenten te voorkomen.
Daarnaast dienen pull requests als een soort documentatie van alle eisen.
Conclusion
Het is nu iets minder dan een jaar geleden dat we deze oplossing in gebruik namen. Hoewel het een initiële tijdsinvestering vergde voor de implementatie, was het het helemaal waard.
We besteden nu meer tijd aan discussies met gebruikers over hun verzoeken dan aan de daadwerkelijke implementatie. De meeste verzoeken kunnen worden opgelost in ongeveer 10 regels YAML. Dit is erg efficiënt en het schaalt goed. We verwelkomen nog steeds nieuwe gebruikers en we kunnen de vraag aan. Ook hebben we de initiële problemen opgelost. Het was dus een succes!
Met dank aan Samy Dougui die dit artikel heeft beoordeeld en met mij heeft gewerkt aan het ontwerp van deze oplossing

 BLOG
BLOG


